 Click for a bigger version!
Right, I think I've gone about as far as I'm willing to go with Squad Lorenzo, with the exception of the text on Zael's crests:

Now, the text is going to be fiddly. The area is big enough for me to put some readable text there, so naturally, I'm obliged to, though not quite as swish as the 'Eavy Metal version:
 Man, I'd forgotten how bloody demoralizing it is to compare one's own work to 'Eavy Metal... :-( In any case, I'll have to decide at some point whether to go with 'ZAEL' or 'ザエル'. Nice part about katakana is that comprises entirely of mostly straight lines that are quite easy to execute with a very small brush. And since it's a syllabic alphabet, that'll mean I almost always have less delicate painting to do :-)
Line highlighting
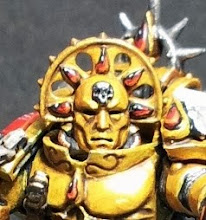
You know, before Squad Lorenzo, I've never done this before. The theory is simple enough. Take a colour significantly brighter than the base colour, then use it to draw lines along all the edges where you'd expect light to reflect. With Terminators, you won't go too far wrong with going for drawing lines on the edges of every patch of colour you can find. So around all that Blood Red armour, I took some Blazing Orange and got to work. Here's Brother Goriel showing off pre and post highlight:

Drybrushing
As usual, simple theory. Take a brush, drown it in the colour you want to use to highlight, wipe off as much paint as you can onto a tissue or something, then run the brush over the surface you want highlighted, allowing the little remaining on the brush to catch on the raised bits. There's a lot of variations of this theme, so I'll start by demonstrating the raw, ugly version on one of the door bases. Observe:
 Fail! But 2 minutes with some Boltgun Metal, a Small Drybrush and a tissue later...
 Tadah! Of course, most minis won't quite be so simple, in which case drybrushing is a much more delicate operation. The trick is to find the right angle to swish your brush.
Wee details
Eyes were done sorta following the GW precribed method for doing Marine eyes, over here. Because of my limited palette, I went over the whole eye once with Dark Angels Green, then highlighted the bottom half with Goblin Green, and because I'm getting too old for this and don't have access to a proper magnifying glass, I skipped out on the final highlight and the ickle dot of Skull White. So sue me. I mean, just LOOK at the size of a Fine Detail Brush* compared to Deino's head!
 So if you think you can put the gleam in the eye of your Terminators, be my guest. I'm just too chicken to risk sending all that effort down the crapper with a misplaced drop of Skull White.
Gems
I was fairly pleased with how these turned out, and how well they contrasted against the armour. Once again, the GW website provided invaluable guidance, this time from the Eldar section. Mostly followed the instructions here. In this case, my colours of choice were Midnight Blue to start, Ultramarine Blue to base, leaving a dark spot in the implied direction of lighting, then a sliver of Ice Blue on the opposite end of the dark spot. Again, I skipped out on risking the blob of Skull White.
One cheeky way around this artificial gleam with Skull White jiggery pokery is to use the LAWS OF PHYSICS! Ahem. That is, put a real gleam in there instead, by making the object shiny. To do this, just coat it with Gloss Varnish. Physics = Win. Unfortunately for me, Lack of Gloss Varnish = Fail. Ah, well...
Wee wires
I suppose I should mention the CAT (Cyber Altered Task unit).
 The Imperium of Man loves their skulls. Anyway, the CAT's here to help illustrate a small point on painting brightly coloured details. Most bright colours don't show up very well on black, even undiluted. I've no idea how many coats it would take to get Sunburst Yellow to look like that, so I used a cunning trick I picked up off a White Dwarf yonks ago: Go over the area once with Skull White, then do what thou will with whatever pretty colour you want.
Genestealers
On seeing the GW colour scheme, I disapproved of the claws. Black?? Being the business end of the Genestealer, I wanted the claws to stand out. The scheme used by GW does very well to give the look on the game board of horrible, sinuous monsters with sharp, pointy teeth lurking in the dark, a la Aliens.
 ZOMG It's coming right for us!
 ZOMG It's coming right for us!
However, I felt a lot of impact was lost in having black claws. No likey. So, I've deviated a bit:

My Genestealers have been based with Regal Blue for the carapace, and Liche Purple for the flesh. Highlighted by mixing in Ice Blue to the Regal Blue and Bleached Bone to the Liche Purple. Left has been highlighted, right is base coat only. Claws were done the same way I did pretty much anything boney. Basecoat of Snakebite Leather, washed in Chestnut Ink, highlighted with Bleached Bone. For claws, especially those nice big ones, I'll deliberately let the brush splay out a bit and let the paint go on slightly streaky.
Anyhoo, that's as far as I've gotten. I don't think I've missed out anything re: how to achieve the paintjob I've lavished on Squad Lorenzo. By the next post, they'll be complete pics will be posted in all their glory, with maybe a Genestealer or two. Beyond that, I'll post pics of the other marines as and when they're completed, and we'll see if there's any improvement by the time I'm done with them. I've already a couple of experiments in mind...
* Smallest brush size available, last time I checked.


1 comment:
Yeah he evolution is notorious, at the beginning were just a pieces of plastic without details and now have grew up. BTW, I used viagra online by first time exactly the day I bought the Squad Lorenzo.
Post a Comment